Engineering Insights & Enterprise solutions
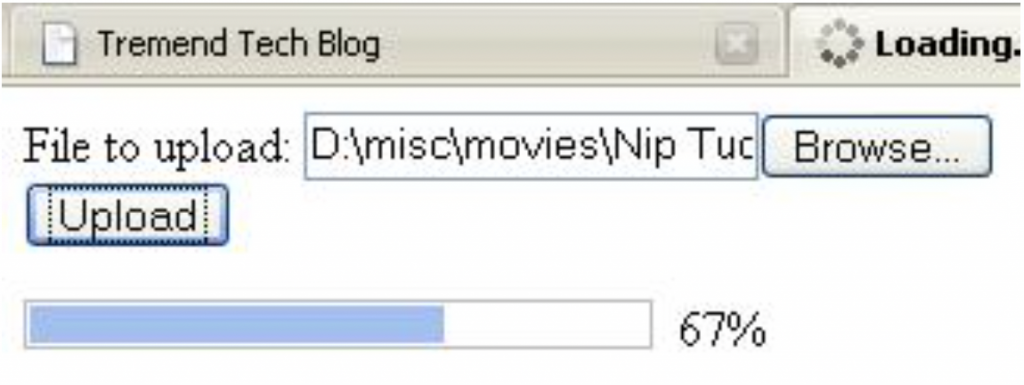
Monitoring your file upload using ajax is a must-have for any web 2.0 application. There are already some good examples developed by prosson and carsonm.
The first one looks great, but it is VERY slow. Takes several minutes to upload a file of 40M on localhost on my Core Duo which is Unacceptable.
Fortunately, the second has the right speed. Actually, it has it all, being written with a prototype. The version I’m posting on this entry is just a variation on the version posted on the mission data blog, using DWR. You can download all sources and dependencies along with the Intellij IDEA project here.

The mechanism is simple and works like this:
- upload request is made with a dummy target (an embedded invisible iframe)
- on the server-side, the upload servlet starts monitoring the upload and sets some objects on the session
- on the client side, a request for checking progress is made shortly after the upload has been triggered
- using DWR this request goes to a DWR proxy on the server-side which returns some statistics
- when the upload servlet finished the upload, it will signal this to the DWR proxy, so that the next request for progress will be the last one
To integrate this into your own application you must do the following:
1. In web.xml declare the upload servlet and the DWR servlet (if it’s not there already):
<servlet>
<servlet-name>UploadServlet</servlet-name>
<servlet-class>ro.tremend.upload.UploadServlet</servlet-class>
</servlet>

<servlet>
<servlet-name>dwr-invoker</servlet-name>
<servlet-class>uk.ltd.getahead.dwr.DWRServlet</servlet-class>
<init-param>
<param-name>debug</param-name>
<param-value>true</param-value>
</init-param>
<init-param>
<param-name>scriptCompressed</param-name>
<param-value>true</param-value>
</init-param>
<load-on-startup>2</load-on-startup>
</servlet>

<servlet-mapping>
<servlet-name>UploadServlet</servlet-name>
<url-pattern>/Upload</url-pattern>
</servlet-mapping>

<servlet-mapping>
<servlet-name>dwr-invoker</servlet-name>
<url-pattern>/dwr/*</url-pattern>
</servlet-mapping>
2. In dwr.xml declare your proxy and a converter for the status object returned to UI:
 <create creator=”new” javascript=”uploadProxy”>
<param name=”class” value=”ro.tremend.upload.UploadProxy”/>
</create>
<convert converter=”bean” match=”ro.tremend.upload.UploadStatus”/>
3. In your JSP or HTML page add the following:
<iframe id=’target_upload’ name=’target_upload’ src=” style=’display: none’></iframe>

<form enctype=”multipart/form-data” name=”form” method=”post” action=”Upload” onsubmit=”return startUploadMonitoring();” target=”target_upload”>
File to upload: <input id=”importFile” name=”importFile” type=”file”> <br/>
<input id=”submitButton” type=”submit” value=”Upload”/>
</form>

<div id=”uploadStatus”>
<!– specify width on this uploadProgressBar, otherwise the progress indicator won’t move –>
<div id=”uploadProgressBar” style=”width:200px;”>
<div id=”uploadIndicator”></div>
</div>
<div id=”uploadPercentage”></div>
</div>
The iframe is used to swallow the response to the upload request. The form contains the upload fields and the button. The uploadStatus div will hold the progress monitor.
4. In the head section of your JSP or HTML you will have to add the following:
<style type=”text/css”>
#uploadStatus {
width: 230px;
}

#uploadProgressBar {
height: 14px;
border: 1px solid #BBB;
text-align: center;
display: inline;
float: left;
}

#uploadIndicator {
height: 10px;
position: relative;
margin: 1px;
padding: 1px;
background: #9DC0F4;
width: 0;
float: left;
}

#uploadPercentage {
width: 20px;
display: inline;
float: right;
}
</style>

<script type=’text/javascript’ src=”dwr/util.js”></script>
<script type=’text/javascript’ src=”dwr/engine.js”></script>
<script type=”text/javascript” src=”dwr/interface/uploadProxy.js”></script>

<script type=”text/javascript” language=”JavaScript”>
var updater = null;

function checkStatus() {
uploadProxy.getStatus(function(stat) {
if (stat.status == 2) {
updateProgressBar(100);
return;
}

if (stat.status == 3) {
alert(“An error has occured! ” + stat.message);
return;
}

if (stat.status == 4) {
alert(“An error has occured! ” + stat.message);
return;
}

// do something with the percentage (nice loading bar, simply show the percentage, etc)
updateProgressBar(stat.percentComplete);
window.setTimeout(“checkStatus()”, 500);
});
}

function updateProgressBar(percentage) {
// make sure you set the width style property for uploadProgressBar, otherwise progress.style.width won’t work
var progress = document.getElementById(“uploadProgressBar”);
var indicator = document.getElementById(“uploadIndicator”);
var maxWidth = parseIntWithPx(progress.style.width) – 4;
var width = percentage * maxWidth / 100;
indicator.style.width = width + “px”;
var perc = document.getElementById(“uploadPercentage”);
perc.innerHTML = percentage + “%”;
}

function parseIntWithPx(str) {
var strArray = str.split(“p”);
return parseInt(strArray[0]);
}

function startUploadMonitoring() {
window.setTimeout(“checkStatus()”, 500);
return true;
}
</script>
5. You can assign unique identifiers to the set of files you’re uploading. The UploadServlet will make sure when the upload is finished to make
all files available on the HttpSession object under the key you’ve specified. To do that you’ll have to:
a) add a new field inside the form:
<input type=”hidden” name=”uniqueFileIdentifier” value=”1234″/>
b) in your java code, you can retrieve the files uploaded like this:
List filesUploaded = (List) session.getAttribute(UploadServlet.FILES_UPLOADED);
This will return a list of FileItem objects (for more information check the commons file upload documentation).