Enterprise solutions
Developing a high volume of mobile applications at a time also involves a large number of QA engineers thoroughly testing the solutions on various environments, making sure that the final product is delivered with respect to the specifications and the quality standards defined. But having a transparent process for test device management, while vital, it’s often difficult.
Because tracking where each device is at a certain time, or which team members are using a specific gadget for testing, we thought about simplifying, optimizing, and enhancing this process through an innovative and effective approach. So we built a smart “SafeStorage”.
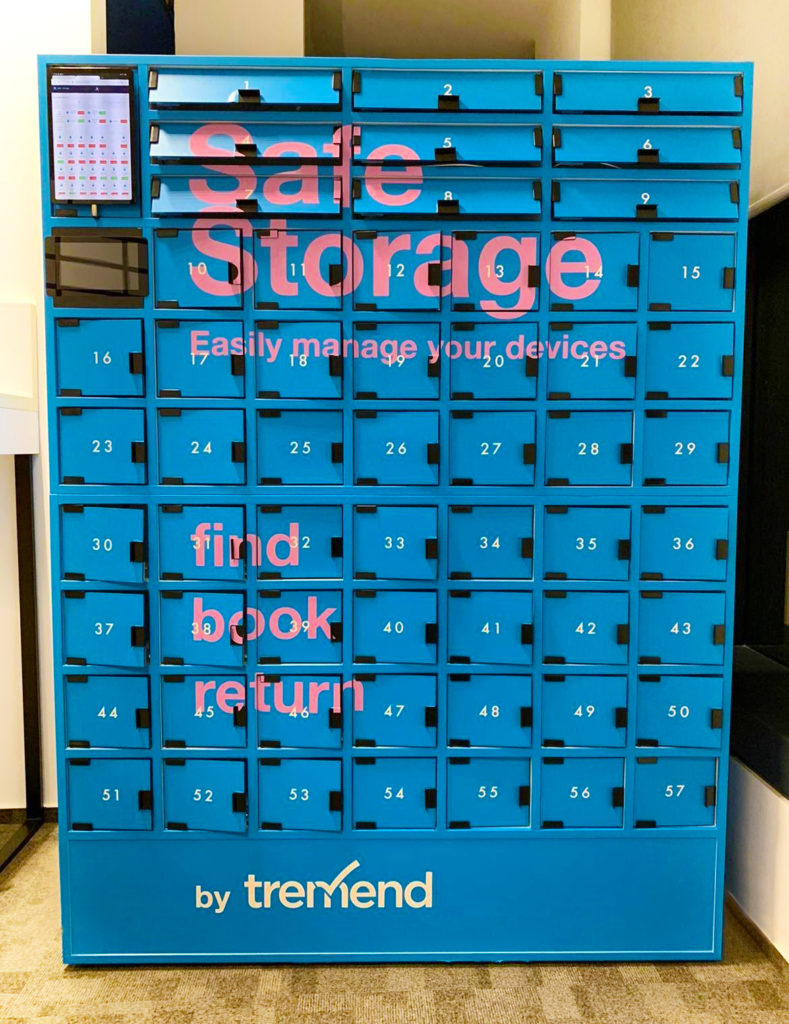
How does SafeStorage actually works?
Spreadsheets, databases, and tables are nice, until you have to fill in too many columns, like your name, the device you need for testing, when you need it, for how long, and so on. We wanted to simplify this process so we designed this smart cabinet, where each phone or tablet has its own locker.
And here comes the interesting part. Using the touchscreen mounted on the cabinet, you can choose the device you want to borrow, then use your access badge (the one used to enter the office) to authenticate, and voilà – the locker with the requested device opens up and the device becomes up for grabs. From that moment on, the selected device will be assigned to you until you return it. The same process applies when the device is brought back.
Also, while inside the SafeStorage, the devices are being charged, which allows our QA team to start using them immediately.
While SafeStorage was created out of a stringent need to maximize transparency and enhance collaboration between our QA testers, this device can also be quite useful in other scenarios. For example, a company that offers its customers the ability to borrow items or devices can seamlessly monitor the entire process with ease by implementing a unit similar to SafeStorage.
The implementation process
The SafeStorage project can be broken down into four main components:
1. Backend – database management, web server, authentication
- Raspberry Pi
- Samsung Galaxy Tab S5E for the User Interface
- RFID Scanner (the device used for scanning the access badges)
2. Frontend
- Web interface
- On site touch interface
3. Device management – detection of device connect/disconnect events
- Mac Mini
- 40 slot USB Hub
4. Locker management – locking/unlocking the individual lockers, power management
- Electrically operated latches
- Power Source Unit
1. The Backend component
Let’s take a closer look at how everything works together behind the scenes, starting with the main hardware components.
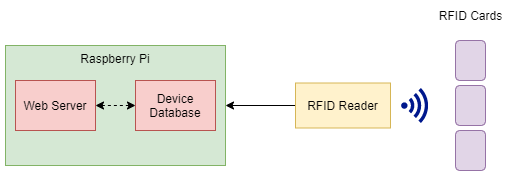
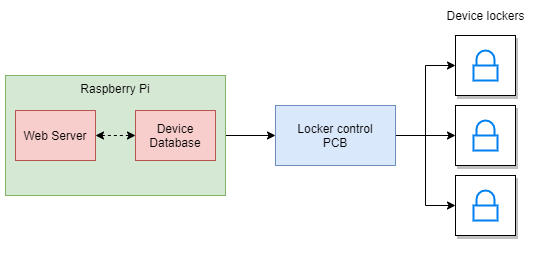
The Raspberry PI is responsible for holding the web server and for controlling the opening/closing of each latch. The electric locks are connected to the power source and controlled through the PCB, which is in turn connected to the Raspberry PI board that sends the signal to open/close the latches. Another important component is the USB Hub, which connects the mobile devices to the power source and to the Mac Mini.
As for the software components, we used Django for the Backend and Frontend sides. Also, some of the more important packages that we used in Django are:
- Django Allauth for user authentication using the Google Mail accounts from work
- Raspberry PI-specific packages to control the GPIO pins to which the latches are connected.
We’ve also used an SQLite database in order to mainly store information about the users and the mobile devices. For each mobile device, apart from its technical specifications (brand, model, OS version, and so on), we also store the current owner (which can also be “nobody” if the device is available), and the previous one.
We also collect users’ email addresses, so we can automatically send them a notification in case someone else needs the device they currently use. In addition to that, we keep track of each user’s ID from the access badge used to authenticate the user on the On-Site Touchscreen Interface, from the Samsung tablet. Furthermore, we register requests from users for borrowing devices at a later time in the future (e.g. “I need the iPhone X from locker 10 tomorrow from 08:00 AM to 11:00 AM”).
2. The Frontend component
On-site touch interface
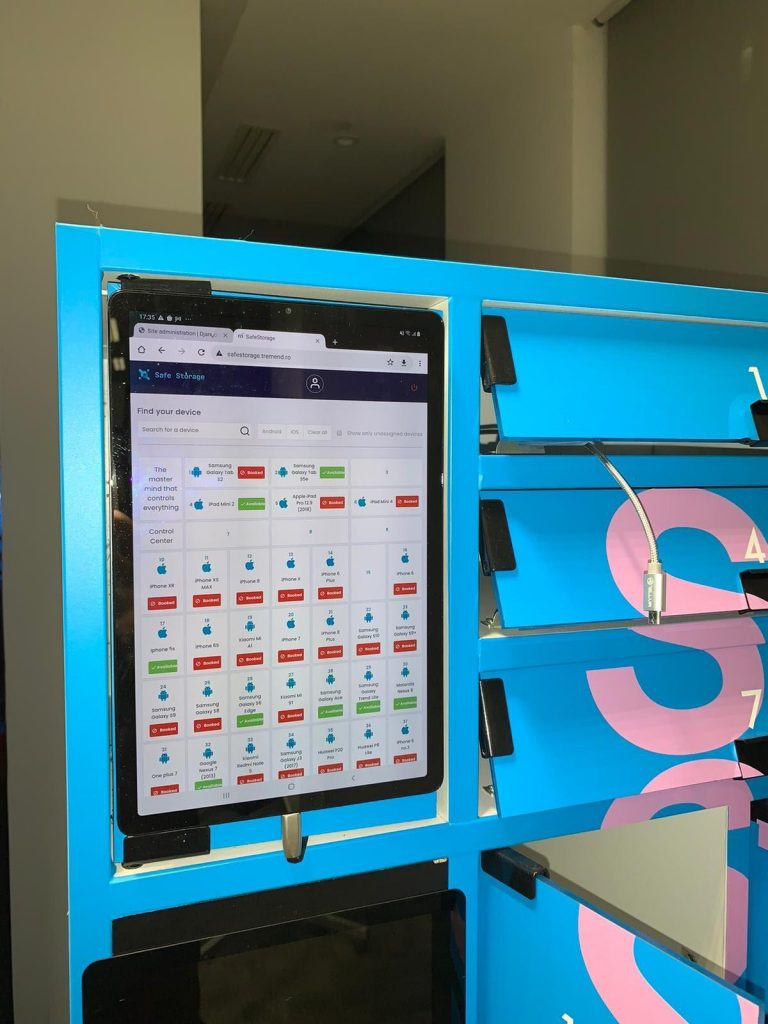
The touch interface is the primary way of using SafeStorage. It provides users with an authentication flow, requiring them to scan their RFID badge to confirm their identity, followed by a step-by-step process to either book or return a device.
The interface allows you to see the list of devices currently registered in the SafeStorage system, along with information about the individual devices. From this list, you can select the device you would like to borrow or return, and the system will open the corresponding locker, inviting you to connect or disconnect the device.
When returning the device, the system checks it to confirm it’s the expected one (the one you have borrowed from that particular locker) and ends the session.
The Web interface
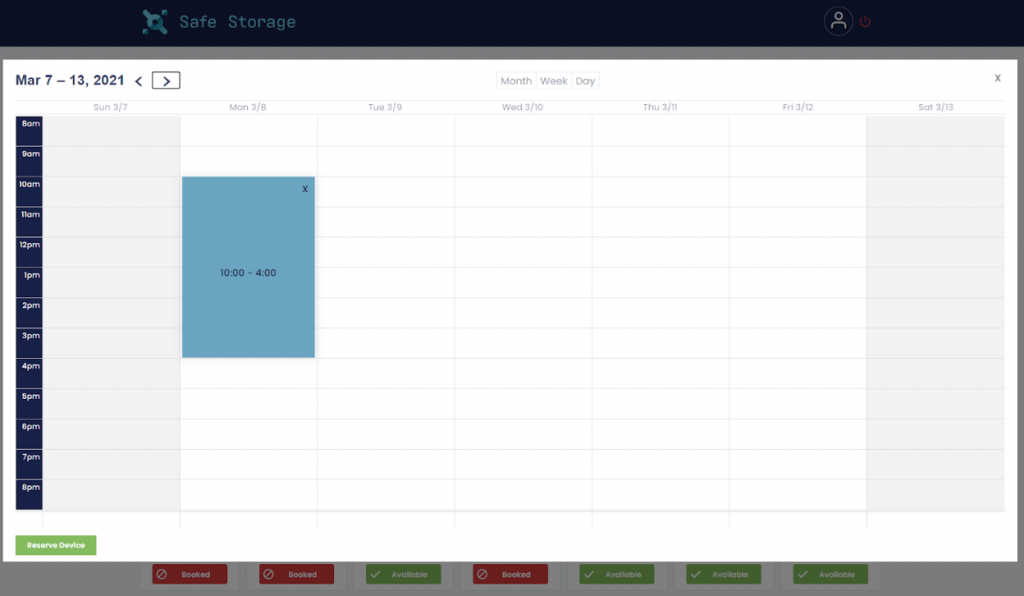
The web interface displays all the devices registered in the SafeStorage system, including their availability in the locker, as well as the name of the user that is currently using the selected device, if any.
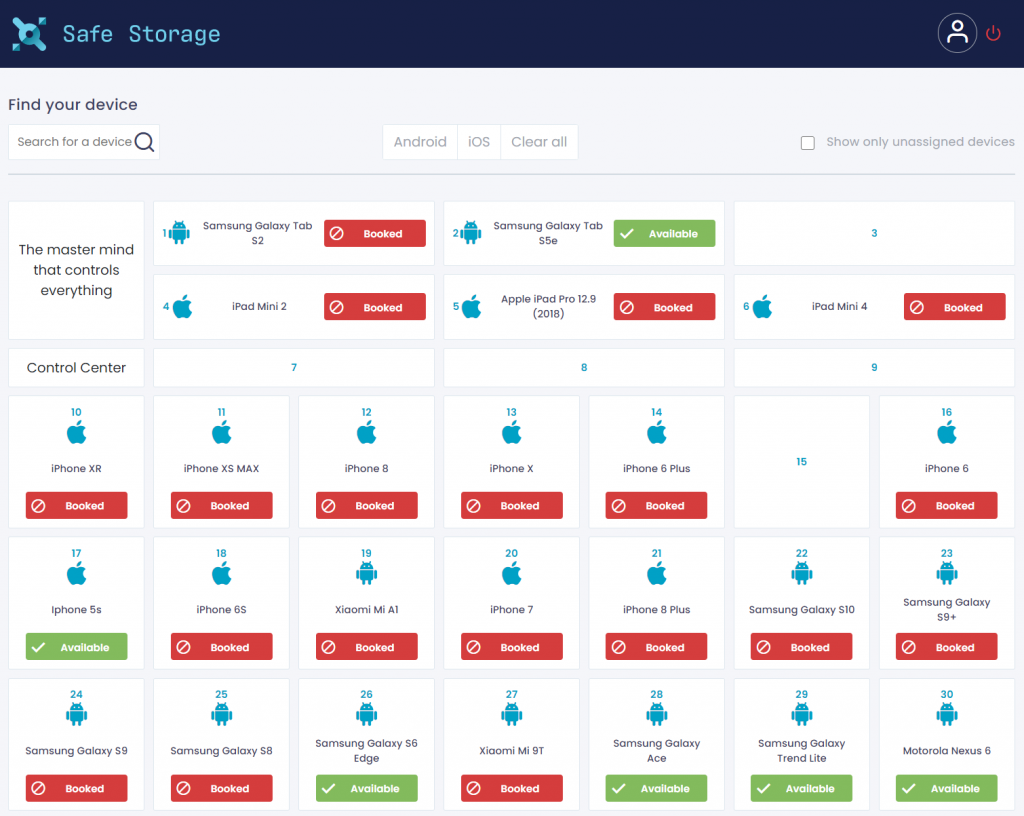
Using the web interface, you can view the actual reservations for each device and can also reserve a device for a given timeframe, as long as the device is not used at that time by someone else. Once a reservation is made, you can pick up the device whenever you want, during their selected timeframe.
3. The Device Management component
As the main focus of this project, the SafeStorage locker must track the devices it stores. The mobile devices (Phones, Tablets) are individually connected to a USB Hub that, in turn, is tied to a Mac Mini Computer. This allows the Mac Mini to detect when a device is connected or disconnected from the system, and identify it based on the USB Serial Number. Having the devices always connected via USB while stored means that they will also be charging during this time, so they will be up and ready for automated testing through the Mac Mini.
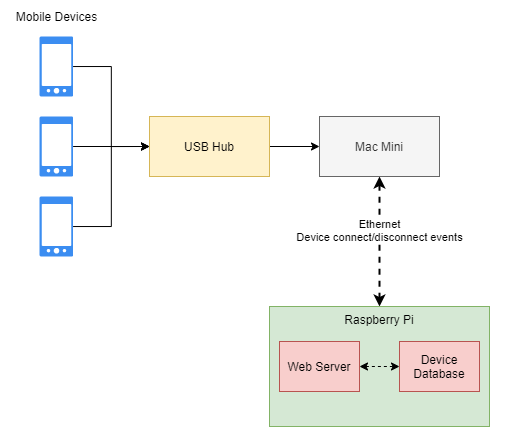
The events are passed over the network to the Backend to allow further processing – completing a borrow/return flow or detecting an abnormal event or an unregistered device.
4. The Locker Management component
The mobile devices are stored in individual lockers, secured by a mechanical latch. These individual latches must be carefully controlled and managed so that they can allow users to seamlessly open the requested locker and either borrow a new device or return the device they’ve taken.
The request to open or close a lock is transmitted by the Backend to a custom-designed PCB that manages the electrical aspects of powering such devices. In turn, the PCB will provide the correct signal to the appropriate lock, commanding it to open or close.
Furthermore, the PCB design incorporates several safety features to protect the unit from over-current or over-temperature events that might occur while managing the mechanical locks.
The image below shows the general structure of the physical components. You can identify the following:
- The USB Hub in bright orange with cables leading to the individual lockers
- The green PCB that houses and powers the Raspberry Pi
- The black power supply that powers the entire system
- The wiring that controls the individual mechanical locks (bundled cables going to the left of the image)

Potential issues
During the SafeStorage development process, we faced a series of issues, some more noticeable and harder to solve than others. The common denominator of these problems was the actual communication component between the web (software) side of the project and the hardware part.
The first issue that we faced and probably the most important one was the time control component of the latches. Basically, when a user wants to take a device from SafeStorage, a request has to be sent to the Backend in order to open the latch with the corresponding device.
The following question arises: how much time do we need to keep a locker open? Maybe you are in a hurry and it takes you only four to five seconds to pick up the device, or maybe you have just received a message on your phone and got distracted, and now it takes up to thirty seconds to pick up the device. Also, maybe you decided against taking the device, so the latch has to be closed ASAP.
To solve this issue, we’ve come up with a simple fix. First, we open the latch for 15 seconds. If the user cancels the request (presses the Back or Close button), the latch is immediately closed. If nothing happens during this 15-second period, a request is sent to the Backend which automatically closes the latch.
However, sometimes a latch would get stuck in the open state, which is bad for two reasons:
- The obvious one: we want all the lockers closed as a safety feature;
- To keep a locker open, power is dissipated across the locker continuously for an indefinite period of time, which creates heat that can be harmful to the electronics.
The issue that was causing this was that the webserver (mainly the Frontend part) sometimes failed to send the request for closing the locker. Therefore, precautions had to be taken to keep the locker’s management as independent from the UI as possible.
As a result, when a user chooses to open a locker, the backend creates a thread that performs this operation, then waits for a predefined period of time, and ultimately checks if the locker was already closed by the user (through a request from the UI). If not, it closes it as a precaution.
Another issue that we encountered was related to the connection to Apple devices. After a certain iOS update, users were required to explicitly allow the connection. This meant that we had to educate our team to perform this extra step on the device when they returned it. Apple says “Your device remembers the computers you’ve chosen to trust.”, but this rarely happens to be the case. Most of the time you are always asked if you trust the new connection. Therefore, we are expecting a fix from Apple that would solve this user interface problem on Apple devices.
Future improvements
As for future improvements, our aim is to solve the issue with the latches, so we’re thinking of replacing the existing ones with another opening mechanism that will simply push the door open. This will no longer require the backend to keep each latch in the open state for a few seconds and then close it. Instead, the latch will receive a one-time, short signal that will release the door from its locking mechanism.
Also, it is important to mention that if a user forgets to lock a door, this will be their sole responsibility, especially if someone might want to take advantage of this and possibly steal the device. The server keeps track of all the actions that happened in the past, so we will know who was the last person to bring back a certain device. Therefore, we’ll also want to add Hall sensors which will enable us to know if a door is open or closed. In this way, we can improve the User Interface by adding a reminder on the tablet to close the door.